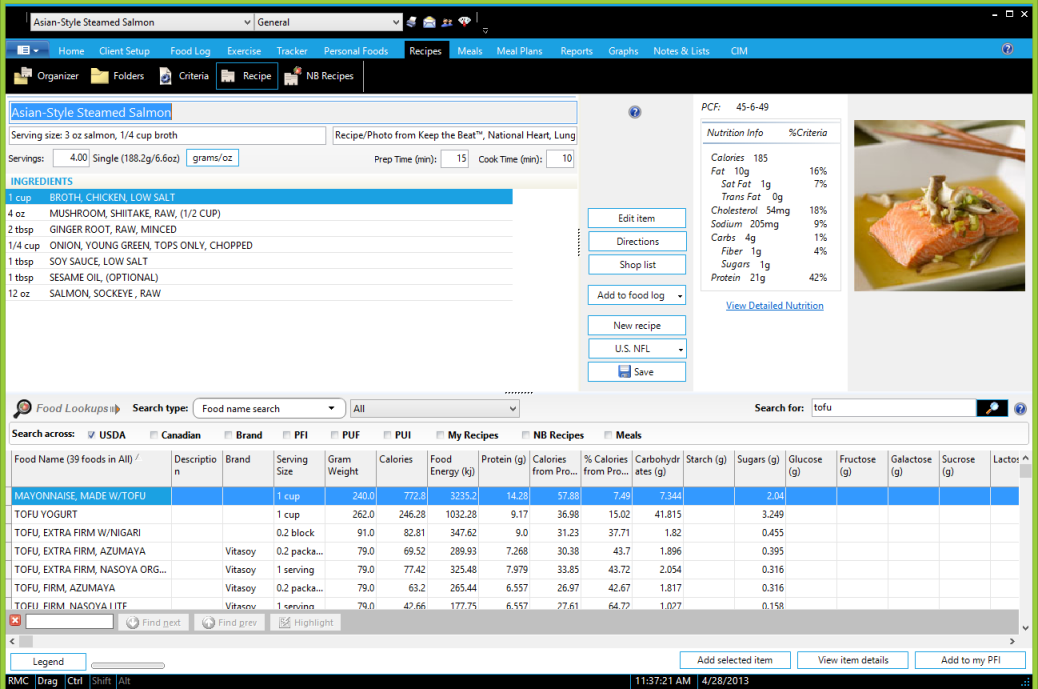
| NutriBase Recipes include food items from our nutrient database, food items you may have added to NutriBase, and other Recipes you have created (like an often-used sauce).

Here are your Recipe window's options:
1) Create a Recipe. Include cooking instructions, preparation and cooking time, comments, and a byline (authorship).
2) Define your serving size in ounces, grams, or number of servings in the entire Recipe.
3) Scale the Recipe. That is, if it serves six, you can scale it to serve any other number of people - say, three people or 500.
4) Display the nutrient profile and the PCF Ratio (Protein-Carbohydrate-Fat Ratio) updated in real time as you build your Recipe. Display exchanges if desired.
5) Create a publication quality Nutrition Facts Label. Include an ingredient listing (sorted in reverse order of gram weight contribution of each ingredient to the Recipe). Edit all nutrient values and ingredients (in upper case or mixed case) prior to generating the label. Include allergen information. Save your label in BMP, JPG, EMF, WMF, PDF, or PNG formats. All labels conform to FDA rounding rules and percentage calculations. View, print, or save any label you create.
6) Organize Recipes into Folders. Each Folder can contain as many Tabs as you like. A Folder might be named “Vegetarian Recipes” and your Tabs might be named “Entrees,” “Beverages,” “Snacks,” etc.
7) Export a Recipe or multiple Recipes to a single file that you can tell NutriBase to email to a colleague who uses any version of NutriBase... they can import your Recipe or Recipes into their copy of NutriBase in one pass.
8) Import any Recipe or Recipes someone gives you.
9) Use any Recipe as an ingredient in another Recipe (i.e., using a sauce Recipe as an ingredient in an entrée Recipe).
10) While viewing a Recipe, click an option to add this Recipe to a client's Food Log, a Meal, a Meal Plan, or Recipe.
11) Sequence ingredients in any order you prefer.
12) Optionally display costing information for all ingredients. Add costing information for any ingredient. You can add cost information to all your Recipe ingredients by using the NutriBase Cost Database. To access this function, click the “Home” Tab to get to the Home Windows, click the NutriBase Menu Icon, and then select the Cost Database option.
13) Calculate your process loss (the weight change due to the process of cooking your Recipe).
14) Automatically add all food items to a Shopping List.
15) Use any NutriBase Recipes - organized by special needs, including: Body Building, Vegan, Vegetarian, Diabetic, DASH (hypertension), Healthy Heart, Balanced Weight Loss, Low Carbohydrate Weight Loss, and 40-30-30 Weight Loss. You can use these Recipes as building blocks for your own custom Meal Plans.
 16) Right click on your Recipe Image or Recipe image placeholder (shown on the right) if you haven’t added a photo yet. Doing so will bring you a host of options for adding, deleting, replacing photos or even adding an image of your Recipe that you may have found on the Web. 16) Right click on your Recipe Image or Recipe image placeholder (shown on the right) if you haven’t added a photo yet. Doing so will bring you a host of options for adding, deleting, replacing photos or even adding an image of your Recipe that you may have found on the Web.
 In NutriBase, you access nearly all software functions via the right click. This approach saves screen space and unclutters the interface... it also makes it easy to quickly view, understand, and implement your options. In NutriBase, you access nearly all software functions via the right click. This approach saves screen space and unclutters the interface... it also makes it easy to quickly view, understand, and implement your options.
 We recommend you view the Recipes Window in your software and right click over each section. This will reveal your many options to you. Study them. Click on them to see where they take you. By doing this in every NutriBase window, you will “get up to speed” with the software far more quickly. We recommend you view the Recipes Window in your software and right click over each section. This will reveal your many options to you. Study them. Click on them to see where they take you. By doing this in every NutriBase window, you will “get up to speed” with the software far more quickly.
To print a Recipe or to generate a Recipe report and save it to a PDF (or other) format, you first create a Recipe Report. Then you can print it, save it, or both.
Note: You don’t create a Recipe report in the Recipe Window. You create reports in the Reports Window. You also print the Recipe report from the Reports windows. As a matter of fact, you print most things by first creating a report and most reports are created in the Report Tab.
This topic updated 07/12/2015 |

 16) Right click on your Recipe Image or Recipe image placeholder (shown on the right) if you haven’t added a photo yet. Doing so will bring you a host of options for adding, deleting, replacing photos or even adding an image of your Recipe that you may have found on the Web.